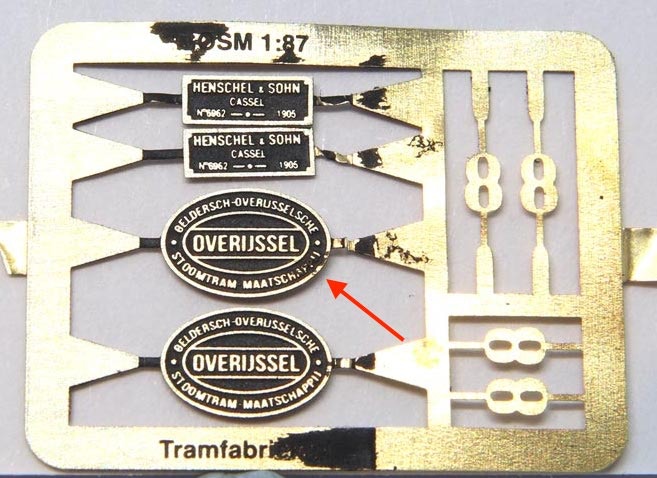
Painting and fixing name and number plates

Remove all the numbers a small, sharp pair of scissors. Use a nail file or fine sandpaper to smoothen the area where the tabs have been removed. The Tramfabriek always supplies more numbers than needed, as I don’t like either searching in the carpet for one essential part.
Paint all the plates (so everything, but not the numbers!) on the frame that holds them. Preferably use an airbrush, as the layer will be really thin, but it works fine with a brush as well.
Glue a piece of sandpaper (grade 600-1200) on a small piece of wood and move with this with a light touch over the painted plates. The higher part of the etch will now become clear. Move the block towards you, lifting it up every time. Don’t rub it back and forth, you will bend the thin etch. Pull, lift up and do the same again. Take a close up picture of the shields with a camera, to check if you cleaned it all. Probably not. So clean it all, otherwise it’s going to annoy you later on close up pictures of the model.
Remove all the plates from the frame. Use the sandpaper to go around the edges. When you used an airbrush, the sides received very likely some paint. It’s not very obvious if you don’t do this, but it will once you make a picture of your model. Again, also pay attention to the places where you removed the tabs. If you don’t smoothen this, they will be obvious on photos (see photo above, left bottom of factory banner).
Now they are ready to glue on the model. The oval plate with the company name and number will be the first item to glue. You centre the other parts around it. Always use Kristal Klear or PVA. These dry transparent and you have enough time to adjust them. Don’t feel tempted to use superglue, as I guarantee you will ruin your model.
Mistakes, not visible with the eye, can still be caught in time when you take a close up picture.
To hold and place the plates, use a pushpin or cocktail stick. I prefer the cocktail stick, for it is easier to handle because if its length and has two sides. Attach a tiny blob of Bluetack to one end of the stick. Push the blob on the front one of the oval number plates. Use another cocktail stick to get a tiny amount of glue and dip this on the back of the oval number plate that you are holding on the stick. Careful not to put much and don’t push to hard, otherwise you’ll loose the plate from the stick. The amount of glue should be so little, that when you push it on the model, no glue will come out from under the edges. Spread the glue therefore well on the plates and you don’t even have to go to the very edge. While keeping the stick with the Bluetack and the plate on it final place, use another cocktail stick to hold the plate in place, while you pull back the stick with the bluetack. Turn that stick around and with the two sticks in your hands, fine tune the position of the plate.
When you are happy with the position of the oval centre plate, put the other two plates in place in the same way. After a five minutes of drying time, you can do the other side. The number on the front is a fiddly job, but with some patience and guts, it’s not difficult. And you can always loosen them again with a cotton bud (Q-Tip) and water. Be aware that you put the tiniest of tiniest amount of glue on each number. It doesn’t have to be spread all over the number. Two points will be sufficient.
When it’s ready, use satin spray lacquer to protect them, from fingers and influence from nature. You can do this at the time you spray the whole model.
If you have a question, you can always contact me.
Cocktail sticks
pushpin
•


